White balance is a tricky thing. I have learned a LOT about photography in the past two years, but one of the things that I am *still* always unsure of is white balance, or color. The perfect white balance in a photograph represents what you truly see when you are right there, in the moment, taking that photo.
There are a few ways you can play with getting the correct white balance. The first way, is to choose the white balance setting on your camera that most closely matches the condition in which you are shooting. Most cameras give you the following options:
Auto (Your camera makes it's best guess for you)
Tungsten (Typical, in-home, lamp light)
Florescent (Typical in-school or building lighting)
Flash
Sunny
Shade
Cloudy
So, technically, if I am shooting on a cloudy day, I could throw my camera in cloudy white balance mode and go on shooting.... but do I do this? No.
Why?
First of all, I typically shoot with fill-flash (a low setting flash to fill in some of the shadows, especially on my clients' faces). So where is my white balance setting that allows me to set my white balance to cloudy with fill-flash? It doesn't exist.
My very best option technically speaking would be to go ahead an create a custom white balance, which is fairly easy to do. Basically, you take a photo of something 100% white in the lighting in which you will be shooting and then you tell your camera, "Yes, camera. THIS is the lighting I am going to be shooting in. Give me my best color!" Do I usually set a custom white balance? No.
Why?
Typically speaking, I do not shoot in a studio (or in any space) where the lighting is constant. In fact, usually, my lighting is constantly changing. So if I were to set a custom white balance when there were clouds over head, and then two minutes later, the sun poked out, my white balance would be off yet again. Frustrating.
So here's where we get to the best solution for this type of shooting. A grey card. A grey card is an awesome tool to achieve correct white balance (when you remember to use it!). Our human eyes are able to see white in any lighting situation. Our cameras cannot. Our cameras see the color of light reflected in the white. For example, a white in tungsten light looks orangish to a camera (so if you set your camera to tungsten light white balance, your camera would produce a bluish tint to compensate for the orange it sees under your house lamps).
BUT guess what? Your camera CAN read neutral grey in any light.
WARNING: PHOTOGRAPHY MUMBO-JUMBO AHEAD: (Skip if you are an amateur or hobbyist or just don't care).
(Quick note: there is some misconception about whether neutral grey is 18% grey or 12% grey. I always refer to it as 18% grey because that's what I was taught and because that's what most photographers go by, however, deep into the educational world of photography, one will learn that the 18% grey actually comes from the print world, while cameras actually meter at 12% grey (one half-stop lighter than 18% grey). However, these two percentages are really so close that it would take the most seasoned and trained eye to spot the difference.)
You can buy what is called a 'grey card' at any camera shop. If you snap two photos right after the other and in one of them, you insert a grey card, you can pull them both into Adobe Camera Raw (or even just in Photoshop if you shoot jpeg), select the white balance tool, and click on that neutral grey and voila! Your white balance is spot-on; exactly the colors you saw in real life when you took the photo. You can see the color temperature that your grey card assigns to your photo (with the grey card present in it) and apply those same numbers to the photo that does not have the grey card in it. As long as it is in the same light; it works!
This option just makes me most sense for me, but as I said, the trick to using a grey card, is REMEMBERING to use it! So what setting to I put my camera to before shooting? Auto white balance. I take a long my grey card, try to remember to use it, and fix the color later.
Here is a photo I took in auto white balance:
 This is my camera's 'best guess' for color. Not great.
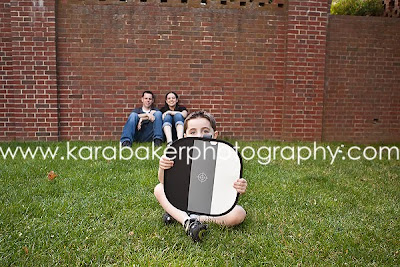
The very next photo I snapped, I asked the little guy to hold my target grey card:
 As soon as I pulled this image into Adobe Camera Raw (ACR) I selected my white balance tool and clicked right in the center of the grey and voila! Beautiful true-to-life color.
(I also want to add that you also see a black and a white section on my 'grey card'. This is because this is a target exposure setting card. Not only can I use this to set my white balance, but I can also use it to ensure correct exposure, but that's for another post!).
I actually selected both the original photo and the grey card photo at the same time so when I clicked on the grey card in the second photo, it automatically fixed the white balance in the first photo. Here is the final photo that I will show to my clients:

(Keep in mind, the internet also alters the colors a little, but you should be able to get the gist!)

No comments:
Post a Comment